Sunday, November 13, 2011

Can-Do Attitude: Black and Red Jam

Ginormous blackberry!
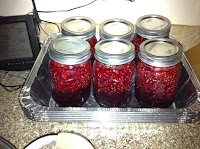
My signature jam?  Black & Red, combining blackberries and raspberries into a wonderfully jammy goodness!

Next to apple sauce, a simple jam is a piece of cake.  Jelly is difficult because you have to strain, but a jam is is just mash, solidify, and jar!

Black & Red recipe:
1 quart crushed blackberries and raspberries
1 pouch of liquid pectin
6 1/2 cups of sugar (yikes, right?!  substitute splenda or sugar equivalent at will...)

First, put your quart of fruit in your pot.

Then, use a potato masher (or whatever you have) to mash the fruit.  I leave it fairly coarse since it'll cook out nicely as you go through the process.

Then, add your 6 and 1/2 cups of sugar.  All jam recipes require a boat load of sugar.  I like using the Splenda Sugar Blend because it cuts the requirement in half, but it's still a lot sugar.  If you want it to taste nice, then you do it.

Once you have it mixed together, bring to a boil until all of the sugar dissolves.  Then, add one pouch of liquid pectin, and bring to a hard boil for one minute.  Be careful because you can easily foam up and boil over.


Skim off any extra foam from the top of the pot to keep your jars clean. 

Turn the heat off the pot after a minute of boiling.  Then, load into your hot jars with at least 1/4 inch of space before sealing with your vacuum sealing lids.


To process, place your jars in a large boiling pot of water, covering the jars by at least one inch of water.  Leave in the boiling water for 10 minutes, remove, and cool. It takes about 24 hours or so to set up the jam, but after that, serve up and enjoy!
Chunky delicious-ness!!

Saturday, November 12, 2011

Taste of Sweetness Saturday: Salted Caramel Brownies

Happy Half-Birthday to Me!!

Last year, I found this recipe for Salted Caramel Brownies over at the Brown Eyed Baker.  (She's amazing, check her out!)   I've made toffee (recipe coming later in the month), but I didn't have a lot of patience for browning the ingredients, so I was a little intimidated to make my own salted caramel.

However, I love me some Ghirardelli Double Chocolate brownies, so I thought I'd make a trade off.  I'll use the box mix (of course, when don't I??) and then make the caramel and insert it into the recipe as needed.


At first, I looked at the caramel recipe and thought, 'really?  Just put sugar in a pot??' But I followed the directions, and sure enough, the sugar melted.  I took it until it was a nice amber color.  If you look at the picture to the left of this paragraph, look to the bottom right of the whisk.  That's probably the best judgement of how deep of an amber I went.  Then, I whisked in the salt, and followed that with the room temperature butter.

By this point, my thumb was cramping from whisking so much!  But, I kept moving, removed the sauce from heat, added the cream, and stirred until we got to this point.  Then the BBE said to let it chill for 10-15 minutes.

This is where I put it aside and worked on following the brownie box mix.  I followed the "thick" brownie route, as per usual, because I'm not a fan of the "cake brownie."
I lightly greased the 8x8, and poured half of my batter into the Pyrex. 

Nice and thick, but not a lot of batter.  I know I didn't want cake, but there better be enough for at least 10 people!!


Then, I made my 9 dollops of caramel on my half layer.  I used about a teaspoonful for each dollop.

Then, I covered this with the second half of my mix and made 9 more dollops on top.  These were far less orderly and discriminate in their placement because I knew there would be 16 brownies cut from here and I didn't want anyone to feel gypped. 
Here,I took a butter knife and lightly swirled the top of the mix, zagging left and right, and then up and down to create this mostly random pattern.  Then, I sprinkled a little sea salt over the top.

I popped it in at 325 and baked it according to the box's directions.  Both the BBE and Ghirardelli said to not over bake.  When inserting a toothpick, there should be a little  that still comes out with it. The brownies sit for 2 hours in the pan so they "finish up" before being cut.

Fair enough. 
The swirls and salt and REALLY noticeable when they come out of the oven! 

The biggest problem with these brownies? You need to make a double batch, because they'll go FAST!!


Thursday, November 10, 2011

It's getting cheesy!

Take a selection of your favorite cheeses...  Then use a couple of cookie cutters...

Then make a wreath!!

Tuesday, November 8, 2011

Fall Bruschetta

Halloween Bruscetta - with orange tomatoes and black olives to help with your color scheme.  (No, these tomatoes don't taste any differently when you change the color.)  Make some crostini and enjoy!

Sunday, November 6, 2011

Can-Do Attitude: Apple Sauce and Apple Butter

Something that I started (for myself) last year was canning/preserving food.  We don't have a pressure cooker, so I'm limited to mostly acidic foods, like fruits, but this really is a "simple" process.  It just takes effort, and a few free hours of your time.  I started with the most basic process - apple sauce.

First, You need to peel, core, and slice your apples.  I've have the coolest inventions of all time.  This makes peeling/coring/slicing 14+ apples an absolute breeze.  Thomas flew through them in about 10 minutes.  You just load, crank, remove, and reload.  You get the perfect rings, and a core-less, peel-less apple ready for making apple sauce.


Then, you add your apples (about 16 medium, or 14 large, in my case) to 2 cups of water in a large pot.


Since apples are mostly water, it doesn't take too long for them to cook down, especially when you crank the stove up on high.


As the apples break down, they will even out with the level of the water.  When they're tender, take them off the heat. 

I drain the apples to remove the water.  You can reserve it, if you want to thinner sauce, but I generally discard it since I like my apple sauce chunky.


Load up the apples into a food processor.  My loving husband bought a 14 cup one for my birthday, so throwing in all those apples is no big deal.

Pulse/puree your sauce to the desired consistency.

Now is the time you decide - do you want sauce or do you want the butter?


For sauce, return the apple pulp to your pot, add up to1/4 cup of sugar per pound of apple.  If you choose a sweeter apple - like a Gala or Red Delicious - you shouldn't have to add much, or any sugar.  You can also add Splenda or a sugar equivalent if you'd like the sweetness with out a lot of extra calories.  Boil the apple sauce, stir in cinnamon, if you'd like.  It's all about your preferences.  If you're canning, you can skip the next few steps and go to the boiling.  If not, use tupperware to save/freeze, etc.  You'll get about 5 half pint servings, which isn't a lot, but it tastes phenomenally!!

For the apple butter, this is a good place to pause.  Moving from apple sauce to apple butter takes a good 6+ hours.  NO WHERE in my original recipe did I realize this - the recipe just said to cook slowly until thick enough to round up on a spoon.  Well, half my day later, I learned!!  Then, I found a new recipe idea - The Crock Pot!

Load your apple pulp into your Crock Pot.  Add your spices - I add about 4 cups of sugar, 2 teaspoons for ground cinnamon, and 1/4 teaspoon of ground cloves.  Stir it well.  I also like to add about 3/4 cup of apple cider when it's in stock at the store, if not, you can add apple juice or water.

Set up your pot to cook on low for about 8 hours.  This will help reduce some of the liquid and the apples will really absorb the spices. 


After eight hours, the apple butter will be darkened, to a more recognizeable color for apple butter.  In order to cook it down more, I leave the lid off, kick it up to high, and let it cook for another 3 hours.  It's not as bad as sitting in front of the stove for all of this time.  WARNING: Boiling apple sauce/butter will HURT like anything as it boils and flies up and hits you.  Try and avoid this at all cost.  Unfortunately, this Crock Pot doesn't get that hot, so after this step, I move the apple butter to the stove.

I have an immersion blender that I use at this step to help liqueify the the butter.  You can leave it to be more "rustic," but that smooth, spreadable texture comes from repeatedly processing the apple butter to your desired consistency.

For jarring, you need to boil the apple sauce, and the apple butter.  The hotter your process the food, the less likely you are to let bacteria grow and poison your friends and family!
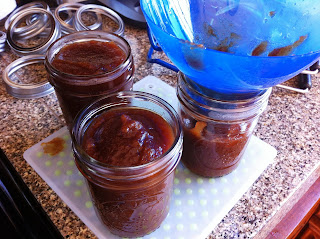
When your sauce/butter is ready and has boiled, then you can pour it into prepared jars.  The jars should be cleaned, and come from a hot (almost boiling) pot of water.  Fill the jars, leaving at least 1/4 inch of space at the top.  Then, add a vacuum seal lid (that has also come from a warm water bath, never boiling), and screw on the lid holder until finger tight.  To process the jars, submerge in boiling water, making sure that the jars are completely covered with at least one inch of water above their lids.  Boil for 10 minutes, and then carefully remove the jars to cool and seal.  You'll hear the lids "pop" as they vacuum seal themselves.

This recipe makes five half-pint jars of apple butter or apple sauce.  Once properly sealed, you can keep the canned goods for up to one year.

Does it take a long time?  Sure, but they taste amazing, and it's totally worth it!  Just know that you're dedicating an afternoon or evening to make a product where you know where every ingredient is coming from!  Plus, it really impresses your house guests, and tastes amazing!  I'll post a few more recipes over the next couple of weeks to show you how easy this really is. 

Today's recipe:
Apple Butter
4 lbs of apples (about 16 medium)
4 cups of sugar
2 teaspoons of ground cinnamon
1/4 teaspoon of ground cloves
3/4 cup of apple cider

Wash, peel, core, and and quarter the apples.  Combine apples with 2 cups of water in a large pot, simmering until soft.  Puree with a food processor, careful not to liquefy.    At this point, you can add sugar/spices to make apple sauce, or add the listed sugar and spices to proceed with making apple butter.

Combine ingredients in a crock pot, cook on low for 8 hours, then high and uncovered for 3 more.  Then, move to the stove, use an immersion blender to make smooth, and bring to a boil.  Finally, jar and process for 10 minutes in a boiling water bath.

Serve up and enjoy!

Saturday, November 5, 2011

Taste of Sweetness Saturday: Pirate Cupcakes

Happy Post-Halloween, everyone!  Are you not over the sugar rush yet??  If you still have a little tolerance for sweetness, here's a fun, easy treat that is sure to shiver your timbers!

First, make your favorite cupcake recipe.  I chose to make some Chocolate Diet Coke Cupcakes.  Some of my co-workers didn't know what that was.  Just pick a boxed mix, and instead of any other ingredients (other than the powder), mix with a can of Diet Coke/Pepsi/Rite/etc.  If you're making a lighter colored cake (like yellow), then use a Diet Sprite or other diet clear colored soda.  Don't ask me why it works, but it does, and it cuts out oil, butter, eggs, etc.  I was lacking those ingredients, so this worked out perfectly.

To make a pirate, you'll only need a few additional ingredients.  Could be more, depending on how talented you are, or how elaborate you'd like to be, but since I was neither at the time, it was basic.

First - the face.  You need an appropriate colored face depending on the country of origin for your pirate.  We had a buttercream frosting, so I made white-ish pirates.  It could happen.

For the head scarf and mouth, just use a fruit roll up.  I got the fruit by the foot, doubled it over and tied it in a simple tie.  Whatever broke off became the mouth.  No biggie.

For the eyes, choose an appropriate colored eye, and then a brown one for the patch.  Some people use M&Ms and Junior Mints for the patch, I just used the M&Ms for both.  The less ingredients, the better.
Next, you need to connect the patch and make a pupil.  Brown would probably work best here, but I only had purple.  You make do with what you have.  Most kids aren't that particular, and if they are, then they obviously don't need my cupcakes.

Finally, my favorite part - the stubble!  Pirates just don't shave the way they used to, so grab some chocolate sprinkles and let your creativity shine through!
Did you hear about this handsome devil's new pirate movie?  It's rated ARRRRRRRRRRR!!!!!!!!!!!!!

Thursday, November 3, 2011

Thirsty Thursday: Whiskey Cranberry Slushies!

It's safe to say that it's officially the "Holiday" season.  We just passed Halloween, Thanksgiving is right around the corner, and then the whole December fiasco follows right up on its heels.  There a more holidays in the last quarter of the year than we quite know what to do with.

I know, however, what makes those holidays go down a little easier - ALCOHOL!  That's right, kids, I'm endorsing imbibing to help keep those holidays bright.  It's with that in mind that when I saw Food Network Magazine's recipe for Whiskey-Cranberry Slushies, I knew we had to jump right in.  It's November 3rd, and there's no time like the present, right??

Super simple, just grab your ingredients...
Mix all the liquids (only 3 cups of cranberry juice) together, including your juice from the limes, and put in a large, shallow tuperware container.

Take out some cranberries and chop them up.  Do you know I've never tasted a fresh from the store cranberry before??  Wow, are they bitter!  I cringe to think how much sugar is added to make these even palatable!!
Then, shove it in the freezer, taking it out to stir evey half hour or so to keep it from truly solidifying. Give it a good five hours, depending (I suppose) on how potent your freezer is vs. how much whiskey you added.  This step seemed to take forever.  The slush took a long time to form, but then BAM!!!  It was ready right on schedule.  Who knew, right?

Once you have a nice slushie formed, fill up your glasses, top up with chopped cranberries, and a sprig o' mint go garnish.  Now, because I was having slush issues, and was concerned about having enough, I did some chopped ice too.  Couldn't hurt, maybe helped?  Doesn't matter.  The drinks were delicious!  I didn't add the remaining cranberry juice as the recipe called for, just filled with the slush and these drinks were amazing!  So much so that I'll be making them again for a big party.  The honey whiskey really helped, too.  I think that was Thomas' favorite part!

After a few, I'm sure you'll be racing the angel to the top of that Christmas tree!


On a PS note, remember how bummed I was about my mini caramel apples?  Well, we tried them again for our fancy dinner, and served them straight out of the pot.  Result?  Caramel still fell off the apple and more stuck to the plate than was actually eaten.  At least they looked cute, right??