Saturday, December 24, 2011

Taste of Sweetness Saturday: Merry Christmas edition

 I always say I'm not a huge fan of Rachel Ray.  This is essentially true of her as a personality.  When I see her on TV, I quickly move forward, hoping to avoid (also) hearing her voice.  Maybe that's harsh, but there's something about her that rubs me the wrong way.

However?  She still gets my cash because I love flipping through her magazine and her recipes.  You win this time, Ms. Ray, you win this time...

 At work, we were going to host a cookie exchange for the residents.  Yes, we were already 800+ cookies in at that point, but then - what's another 8 dozen??  Since this was for grown-ups, I went with a more labor intensive recipe (so dumb), but luckily it turned out great, and people seemed to really enjoy them.

And so, here's her recipe for Hot Cocoa Cookies.

I started with a metric boatload of the best baking chocolate a chain store could provide, and escalated it from there!

Super simple.  Roll and bake the cookies...
 As soon the cookies come out of the oven, add some broken chocolate bars to the top.

Then, take a half (hamburger style) of a marshmallow and press it down on top until you see the melt-y chocolate ooze out from the bottom.

Yes, your chocolate will ooze.

No, you don't have to be worried.

Yes, you should refrain from dipping your finger in to taste it at this point, but I promise it's worth the wait!

Finally, shave chocolate on top.  I only had a zester, so my shavings were far smaller than I would have liked.
These are best eaten warm and gooey.  Zap in the micro for 10 seconds after storage
before you bite into one.  Totally worth it!

Thursday, December 22, 2011

Peppermint Bark Cookie Tartlets

When I found this recipe, I was so excited for Christmas that I could barely wait to try it out.  In fact, if you remember, I tried them this way first.

The peanut butter cookies were so easy that I had absolutely no worries about this recipe.

Turns out, I was SO WRONG that I had to revamp what I was doing several times in order to make these work out properly.  I gave up half way, and then started back again once I realized I was being beaten by a cookie.
And an INSTANT cookie at that.  I didn't even make the dough.  I just bought the pre-made sugar cookie roll like it was going out of style.

Ridiculous.  In addition to four rolls of cookie dough (I couldn't find the tubs), I used two bags of white chocolate chips and 7 candy canes, crushed, but not pulverized.  I was trying to triple+ the recipe, so you probably won't go through as much, but this is where I stood.
One thing I changed was the cooking parameters.

First: no flour.  It made them crumbly and it didn't work well in the later steps.

Second: Bake at 350 for 11+ minutes, like the directions on the cookie tube states.  Lower did not work well for me.

Third: cook until the edges are lightly browned, then cool for about five minutes and remove from the muffin tins.  Some bottoms will stick and you'll need to squish them back on.
Warmth helps with this, but completely cooling them would make it difficult.  Also, I moved them to parchment as soon as I could lift them out.

THEN I finally added the chips and peppermint.  The chips were helping to weigh the bottoms down when I added them before, aiding the removal of the bottoms from the tops.  This way, the weight could wait!

Finally, I put them back in the oven for about a minute to congeal.

Lost yet?  It wasn't so bad, I promise.

Basically, roll pre-made dough (as it) into 1" balls and press into mini muffin cups.

Bake 11+ minutes at 350 until edges are golden.

Remove from oven and wait about 5 minutes.

Remove individual tarts, squishing the bottoms back on as necessary (about 2 in 10 will stick).

Add white chocolate and peppermint

Bake again for a minute to lightly melt the toppings.
Not bad, once you get the hang of it!

Tuesday, December 20, 2011

Easy Caramel Corn

Doubling the recipe...
Before starting this recipe, it's pretty good to have an idea of what you're getting into.  About 3 bags of ORP/6 bags of generic bagged corn makes 7 quarts.  You can make it on the stove, but I was at work and don't have that kind of patience.  7 quarts of popcorn covers two large cookie sheets really well.  If you can't fit more than two cookie sheets in your oven, then don't double the caramel until you can use it.  My assistant learned this the hard way and I almost killed her for it.  Go low and slow and it'll help.  Promise.
So, without further ado, the recipe!  Now, when I found this recipe, I was quite Dawson leery.  It's called My Amish Friend's Caramel Corn, which is fine, but it seems to be pandering to an audience.  There's a story about it, and whatever, but why not just call it Amish Caramel Corn?  Why bring yourself into the equation like you're a gift to the Amish?!

I'm not bitter, just thought it was odd.


My assistant was so excited to learn how to make caramel this way that she called both parents and just about everyone she knew to gloat.  It was cute.  I didn't realize this was such a feat.


The recipe does a great job at walking you through the process.  It's simple (unless you're trying to take pictures at the same time.

After you make the caramel, you need to coat the popcorn that you've so nicely laid out on the cookie/roasting sheets.

Sounds easy enough, but I had a problem.  I didn't like the way the popcorn was coated.  I know that you will stir the popcorn no less than three times throughout the baking process, but the better coated you are going in, the easier the coating will be throughout the next hour.

For my second batch, I put the popcorn in a large metal bowl and tossed in the caramel that way.  It made it much quicker in the long run.

In my caramel corn research, I discovered that it's the low and slow cooking that helps to preserve the corn for longer periods of time.  By cooking it for an hour (sometimes more, depending on the recipe), you dry out the popcorn to make it more preservable.  One lady said she saves hers for months.  I'm not sure how because this caramel corn absolutely melts in your mouth.  It's so more-ish that is borderline addictive.  Real talk.  Definitely worth the hour, or so, of your time.  Cool completely, and store in an air tight container.
7 quarts of pure love!  Great holiday gift, too!!

Sunday, December 18, 2011

Can-Do Attitude: Mrs. G's Chutney

As it goes, I found myself surrounded by South Africans on a near daily basis... Well, at least one, but upwards of 10-15 on the weekends. I'm not complaining, I'm just saying that I'm getting used to different flavors and products that you don't regularly find in America.

One prime example of this is Mrs. Ball's Chutney.  There a little sweet and spice and completely yummy that complements a good grilled meat, like sausage, chicken, pork, or anything that could be accented with it's peachy flavor.

The problem?  A bottle like this at a South African or British import store runs about $6, and it's a pain to go to one of these stores for a condiment.  My response?  Find a recipe and can it ourselves!

Sorting through online blogs, I found this recipe repeatedly.

I love recipes that are in metric, really I do.  However, when I'm grocery shopping for supplies, that doesn't really help.  So, here's what you (more or less) need (fellow, backward Americans):

2.7 C dried peaches (difficult to find, use more apricots as necessary)
1 C dried apricots
.8 gallons of brown vinegar (like malt vinegar)
11 C of white sugar
2 1/5 C of minced onions (just over 1 pound)
1/2 C of salt
1/4 C of cayenne pepper (OR LESS!!!!!!!)

To start, you need to soak your dried fruit in vinegar overnight.  It needs to be enough to coat, so between 4-8 cups.
The next day, you cook the fruit and vinegar (same from the soak before) together until soft.  Then, drain the fruit (reserving the vinegar) and put the fruit through a mill or fruit processor.


Process it to the consistency you'd like the fruit to be in the final product. I wanted it to be chunky, so that's what I chopped it to!    Next, cook your onions until almost clear, and add them (and the sugar) to your vinegar.  Also, add in your fruit at this stage. 


 At this point, you may need to add more vinegar.  It's up to you, but at this point you need to make the chutney to its final consistency.  If you want a thinner, more runny chutney, then you'll need more vinegar.  If you want it hardier, than use less.  Your call.

Finaly, add your spices and cook for an additional one to two hours.  Make sure you stir it occasionally to avoid burning.
 When I mixed everything together, I put it in my crockpot to cook it down.  That way it wasn't a burn issue, and I knew it'd be consistent.  There's a lot of cayenne in the recipe, and if you don't like the warmth, add less.  Next time, I know I'll only use about 1/8th of a cup.

Finally, when you have the color and consistency ready to be bottled (I left it about three hours -on low- because we left the house for breakfast and errands), bring the chutney back up to a boil.

Place the chutney in your hot, clean jars, leaving 1/2" of head space.

Then, you will process the jars for 20 minutes in a boiling water bath to help seal the self-sealing vacuum lids.  I made about 16, half pint servings.
It might not be Mrs. Ball's, but it's certainly Mrs. G's!

Thursday, December 15, 2011

My Nuts...

I have now endured three weeks of jokes about my nuts.  No worries, they're just as great as everyone makes them out to be!

Mix yo' nuts!
This is Ina Garten's recipe from how easy is that?  

WARNING: these are highly addictive.  They're slightly spicy, but also sweet.  It all balances out, and for how easy it is, it's totally worth it!

Recipe for Chipotle and Rosemary Roasted Nuts
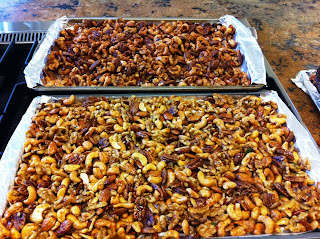
Coat and place them on a lined baking sheet

The top is post-roasting, the bottom is about to go in the oven.  It's hard to notice when you're whipping these out at 100 miles per hour, but side by side you can tell.

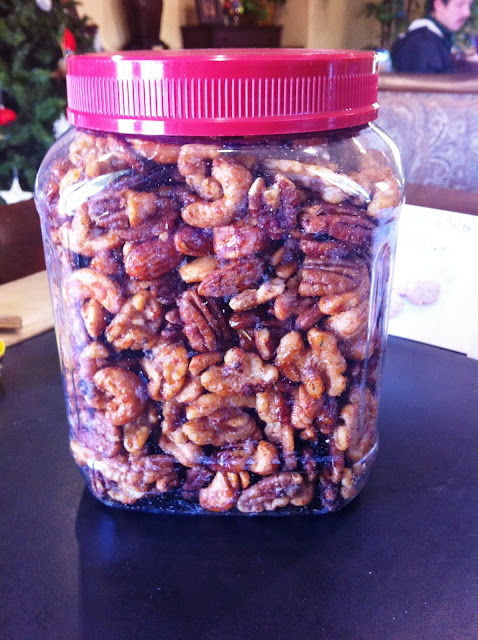
Once they've cooled, spread the love!  everyone loves getting things like this for birthdays/bar mitzvahs/holidays, etc!

Plus, bonus?  No filler peanuts that everyone leaves for last anyway!!
Ready to Go!

Tuesday, December 13, 2011

Brunch Squares

Any recipe that starts with bacon must be amazing!


Okay, today is another trip down to the brunch-tastic vault.  I can’t help that I’m not always original, but I can help that what I choose to place on my table is delicious, and almost always a crowd pleaser!  Today, we’re also looking at a Pampered Chef recipe for Brunch Squares.  No worries if you can’t read a pdf file, I’m here to give it away for free!


First off, of course, The Ingredients:

1 teaspoon vegetable oil
2 cups (8 ounces) grated Colby & Monterey Jack cheese blend, divided
1 package (22.5 ounces) frozen hash brown patties, thawed (10 patties)
8 ounces cream cheese, softened
12 eggs
½ teaspoon coarsely ground black pepper (plus more, optionally)


  8 ounces thickly sliced deli ham (or 1 lb of bacon, cooked and diced)
 4-5 green onions with tops, divided (1 cup sliced)
 3 plum tomatoes (seeded and diced)

First, brush your stoneware bar pan with olive oil to ensure that it’s well seasoned.  You’d hate to have any of this stick behind while serving it up.  Next, crumble your hash brown patties into a single layer on the bottom of the pan.  Usually, I’m a wimp and my fingers freeze during this process, so I dice them with a handy dandy knife and then press them down once they’re in the pan.  Next, top with half of the required cheese; I buy pre-shredded cheese, but you could just grate your own, too.  Bake at 450 for 13-15 minutes, or until the edges are browned and the cheese is melted.

While that’s baking, whip the cream cheese until smooth, then gradually add in the eggs, and black pepper, whisking until smooth again.  I use a hand mixer to speed up the process, but it’s your call.  Then, add in ¾ C of your sliced green onions and your bacon (or ham) to the mixture.  It’s only there for a minute or two, so no worries, I promise.

When the hash browns are ready, remove from oven and let them cool while you’re finishing prepping.  If you’re ready, then go ahead and add your egg/cheese/bacon/onion mix on top.  Use a spatula to make sure everything is evenly spread, and then pop the tray back into the oven for 6-8 minutes.  This time, make sure the egg is set in the center and that the top looks like a cooked egg.  Sounds odd, but color helps!

Remove the pan, top with remaining green onions (1/4 cup), diced tomatoes, and cheese (4oz).  I then return it to the oven for about 2 minutes to heat through and melt the top layer of cheese.  Finally, remove it, cut it, and serve immediately.  Your guests will thank you for it.  While there is a bit of prep, and a lot of little steps to this recipe, it truly is easy, and so good.  It’s everything that makes a breakfast great, and you should give it a try when expecting a few for breakfast.  This makes 12 servings, but depending on your crowd, it’ll comfortably feed 8-10.

I'm not even a tomato fan and I find these delicious!!

Saturday, December 10, 2011

Taste of Sweetness Saturday: Chocolate Crinkles

Truth?  I've never made truffles.  There's something about the chocolate gooey experience that doesn't appeal to me.  I liken it to making meatloaf: it's something that I enjoy but don't want to touch in the unfinished stages.  Sure, you can call me a wimp, but it doesn't change anything about the way I'm feeling!!

Well, I thought I'd try to make Chocolate Crinkles last year, not realizing how truffle-like they really were.  It's a recipe that takes time, you get extremely chocolatey, and you produce very few cookies for the effort.

Worth it?  Absolutely.  Especially if you know, or are married to, a chocolate lover like I am.  The recipe I followed can be found here.  It claims to make 3 dozen, but I was pressed to make two, and they're small any way.  Regardless, give them a try.  They really are a taste of sweetness.

Now, this year?  Have I mentioned my party for 200 at work called Cookies with Santa??  We're in the midst of making 64+ dozen cookies for the event.  I wanted to make something similar to crinkles, but I was hoping for something a bit less...messy.  Luckily, now I have assistants that can do the work that bothers me, and I can just reap the rewards!

This year, I decided to turn to the Brown Eyed Baker.  A cousin of a college friend who has served as my inspiration a few times in the kitchen.  If she can come up with Irish Car Bomb cupcakes, she has my vote of confidence!  So, I picked her Better Than Brownies Chocolate Cookies and they are amazing!  The only thing I took from my Crinkles recipe was to roll the cookies in powdered sugar before baking them.  They look almost the same, but the recipe makes a ton, they grow exponentially in the oven, and they are sinfully heaven.

Truth? You could choose either recipe for a decadent chocolate cookie.  They're both awesome.  However, I think the Better Than Brownies are easier, and I like that the decadence is just as great as the crinkles.  Give them both a try.  You won't regret either, I swear!
I cooked them on parchment to ensure they wouldn't stick.  I didn't want to use any grease on these.
Worked like a charm!

Thursday, December 8, 2011

French Toast Strata

The yolk's on you!!  (I doubled the recipe...)

Today’s feature: the dream breakfast or brunch entrĂ©e.  It’s hard to believe that there could be an item (or two) that people request over and over again for breakfast, but this is one of my mama’s recipes, which always ensures that it is spectacular (SPECTACULAR!), and that it’s reliable even for an okay baker like me.  I’ve talked about this before (because it is brunch-tastic), but here’s the secret family recipe…

French Toast Strata

Ingredients:
1 lb loaf of unsliced French bread
8 eggs
6 T butter, melted
8 oz. of cream cheese, cubed
2 and ½  C milk or half and half
¼ C maple syrup (plus more to serve)

Easy ingredients, right?  Even easier directions…

Cut the French bread into 1” cubes (makes about 12 cups).  Then, grease a 3 quart baking dish.  I like to coat it with butter (of course), but you could use a spray.  Place half of your bread cubes into the dish, then top with your cream cheese cubes.  Top off with your remaining bread cubes. 


Next, combine your eggs, milk, melted butter, and maple syrup in a bowl and mix well with a hand mixer or blender.  I like to fluff it up on high, but just make sure that it’s well combined.  Pour the mixture over your cubes. 

Use a spatula to slightly press down all the layers to make sure everything is well moistened.  (Ew.  I hate that word.  Do it just the same.)  

Cover with plastic wrap and refrigerate for at least two hours, but you can go up to 24 if you’re really well prepared.

That morning, removed the plastic wrap and bake at 325 for 35-40 minutes.  I like to broil for the last minute or so to crisp up the top, but that’s a personal preference.   Just bake until the center sets and your edges are lightly golden.  Let stand for about 10 minutes, then serve it up with warm maple syrup.

I promise that this is a winner every time.  It’s the perfect combination of French toast with cream cheese, and it is so easy that you won’t mind making it every time someone requests it (because you really love eating it, too!).

Seconds, please!


Tuesday, December 6, 2011

Apple Crisp

It's fall/winter here in Southern California.  Most don't notice, and those from back home might think it's summer.  However, there's a nip in the air most mornings and evenings, and I'm still on a baking kick like you wouldn't believe.  I do love all things apple, but (surprisingly?) I have never made an apple crisp.  I've tried apple pie before, but never it's easy cousin the crisp.  Plus, nothing makes a crisp quite like some ice cream on top, so you better believe I was up for this challenge!

The first person I turned to when looking for a great recipe was my doppelganger, Ina Garten.  Laugh, but people are always asking if we're related, or they are doing a double take.  I don't always see it, but I get the similarities.  Her recipe can be found here, and I pretty much just stuck to the book on this one, although I did use a 9x13 rectangle instead of an oval...  Just enjoy, mm-kay?
McIntosh Apples, well coated

Squeezing everything into and on top of the dish!

Bake it up

Letting it rest a bit.  I might have added more oats to make a thicker topping.  SO GOOD!

I didn't peel the apples beforehand, so you'll see some skin in there.  Didn't make a difference to me.

AH-mazing.  I'll definitely make this one again!