Monday, December 3, 2012

Chocolate Peanut Butter Pretzel Bites

Holy AMAZING, Batman!

If you're looking for a simple dessert that is both sweet and salty, I've found your kryptonite.  Or your salvation.  I guess it depends on which comic we're reading because now I'm confused!  ;)

Ingredients:
2 C creamy peanut butter, divided
3/4 C butter, softened
2 C powdered sugar, divided
4 C broken pretzel twists, divided,
2 C semi sweet chocolate chips, divided
Directions:
1. Line a 9"x13" baking pan with foil and a little overlay.  Lightly spray with a non-stick cooking spray.
2. Beat 1 1/4 C peanut butter in and butter in a large bowl until creamy.  Gradually beat in 1 C powdered sugar.
3. Stir in remaining 1 C of powdered sugar, 3 C of pretzel pieces, and 1/2 C of chocolate chips.  Press evenly into prepared baking pan.
4. Microwave remaining 1 1/2 C chocolate chips and 3/4 C peanut butter on medium, uncovered, in a microwave safe bowl for 45 seconds.  Stir. If necessary, return for 10-15 second intervals until completely melted.
5. Spread chocolate peanut butter evenly over pb/pretzel/powdered sugar layer.
6. Top with remaining pretzel pieces, pressing down gently into the chocolate layer.
7. Refrigerate at least three hours, or until firm.  Lift out of pan and peel off foil, then cut and serve.

Friday, November 30, 2012

French Onion Mac & Cheese Bites

This recipe has me so excited.  I LOVE mac and cheese in ways that probably shouldn't be considered normal.

(But, if you haven't noticed how 'not normal' I am by now, is this really going to burst that bubble for you??  Probably not...)

I love the idea of individual serving sizes and cups, it keeps people from getting too grabby.  I might have overcooked some of these, so don't mind the dark hues, just note that the taste is fabulous and take it from there!

Ingredients:
1 T butter
1 T flour
1/2 C cold milk
3/4 C shredded Gruyere
2 T diced onions, lightly sauteed
1 C macaroni
freshly ground black pepper to taste
chives for garnish (optional)

Directions:
1. In a pot of salted, boiling water, cook the macaroni until al dente and drain.
2. Heat butter over medium low heat in a sauce pan.  When bubbly, whisk in flour and combine into a thick paste.  Turn heat to low and continue to whisk until roux is cooked, not brown.
3. When the roux looks slightly grainy, add the cold milk and whisk.  As the milk heats up, any lumps will disappear.  Continue to stir over medium low heat until sauce is bubbly and thick.
4. Stir in 1/2 C of shredded Gruyere and onions, then season with pepper to taste.
5. Fold in macaroni into the cheese sauce.  Spoon into lightly greased mini muffin pan and compress to help maintain muffin shape.  Top with remaining gruyere and bake at 350 for 30-35 minutes or until tops are nicely browned.
6. Let muffins cool before removing.  Garnish with snips of chives and enjoy!


Tuesday, November 27, 2012

Two Easy Apps


Here are two quick appetizer ideas that I worked with for our last party...

1. Hummus served on bell peppers.

I used both plain and sun dried tomato hummus, and piped them onto chopped pepper pieces.

Great for presentation and made my buffet line move quickly since people could just grab and go.
2. Beeting Heart Skewers

This was nice because it was easy to make and I love using beets for the color they give.

Ingredients:
8 oz fresh goat cheese, at room temperature
2 tsp finely chopped fresh rosemary
1/4 tsp freshly cracked pepper
8 oz baby beets, peeled and steamed, divided into 36 pieces
14 oz whole hearts of palm
36, 4" skewers

Directions:
1. Mix together the cheese, rosemary, and pepper.  Roll into 36 balls, approximately 3/4" big
2. Place goat cheese, beet piece, and heart of palm on each skewer
3. Arrange/serve as desired.

Sunday, November 25, 2012

Hot Caprese Dip

The best part about making a hot Caprese dip is that it's so easy, and it combines everything you like about a Caprese salad in a nice, warm dip.

The problem?  Tomatoes are so juicy and it's just not a terribly pretty dish.  Also?  It's so cheesy (not necessarily always a bad thing) that it's difficult to serve without making a mess.

It is still super flavorful, though, and it's a nice change.  I might still prefer doing the skewers, though, just because it serves up more neatly.
Ingredients:
10 oz fresh mozzarella, chopped into cubes
2 Roma tomatoes, seeded and juiced
3 T freshly chopped basil, plus more for garnish

Directions:
1. Preheat over tne 375
2. Combine all ingredients into your dish
3. Bake for 14 minutes, then broil for 3 to make a nice bubbly golden top.
4. Serve immediately with crostini or toast

Friday, November 23, 2012

Sausage Stuffed Jalapeno Poppers

I LOVE jalapeno poppers.  The problem?  I don't have a lot of patience to make them.  There's something about washing the cut peppers and the capsaicin fumes that try to choke me out that just makes it not so much fun.  So I try to find other ways to make poppers.

And then, my gorgeous cousin made these poppers for me and I knew that there was no going back.

EVER.

Seriously.  They're that amazing!

Ingredients:
1 lb of ground sausage (any you prefer)
8 oz of cream cheese (softened)
2 C shredded four cheese blend, divided (I used the Mexican mix)
1 lb of jalapenos, halved and seeded
1 green onion, finely chopped

Now the prep work on this takes longer than I would normally like, but know that it is completely worth it and definitely worth the try.

Directions:
1. Preheat the oven to 425 degrees.
2. Brown sausage in a skillet.  Drain and cool (slightly)
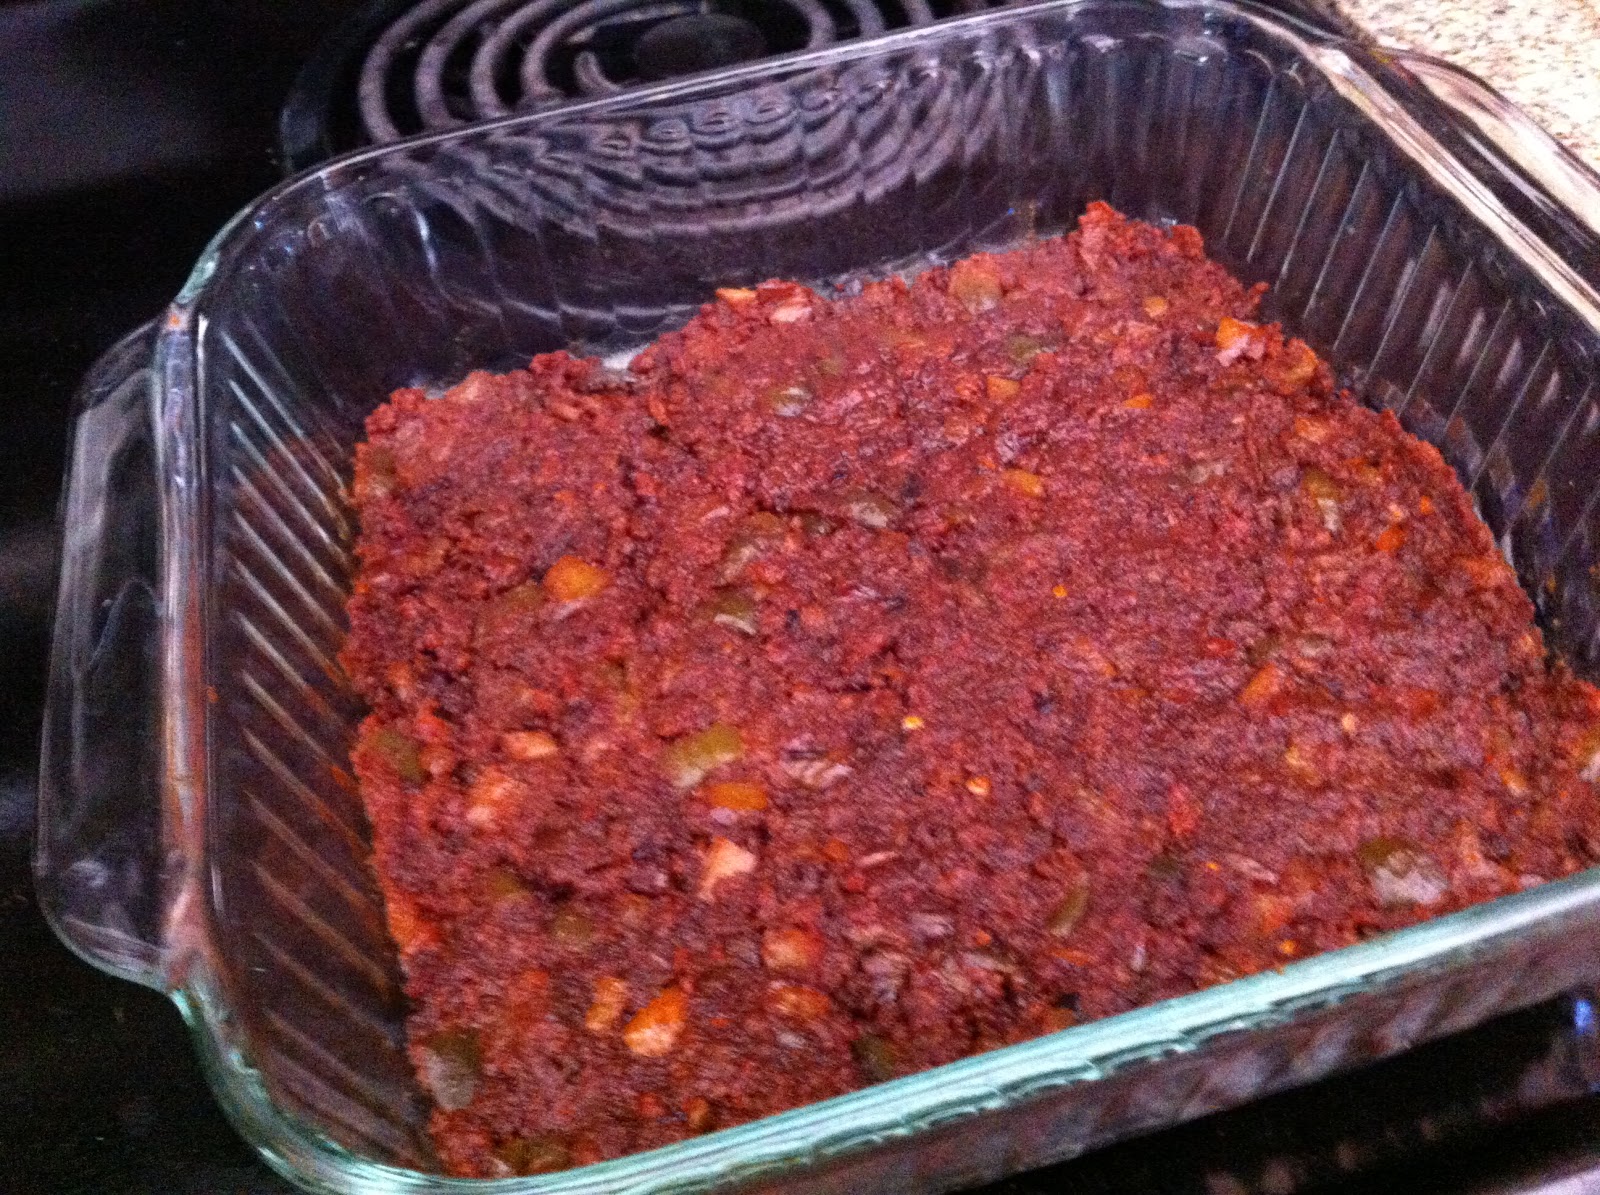
3. Mix cream cheese, 1 C of cheese shreds, green onions, and sausage in a bowl.  The heat of the sausage helps to melt the cheesey goodness together.

*At this point, I paused.  I put everything in a zip lock bag and stored it over night.  I had already prepped the peppers and put them in their own bag as well.*
The best part about pausing a bit here, is that the cream cheese re-solidifies as it cools, which makes it easier to work with.  You can slice it and dice it which makes it easier to form in the peppers. You can work straight through at this point, I just had a lot to prep so this was a convenient place for me to stop. (and no, I didn't leave the oven on all night!)


4. Place your stuffing into your halved jalapeno pieces.

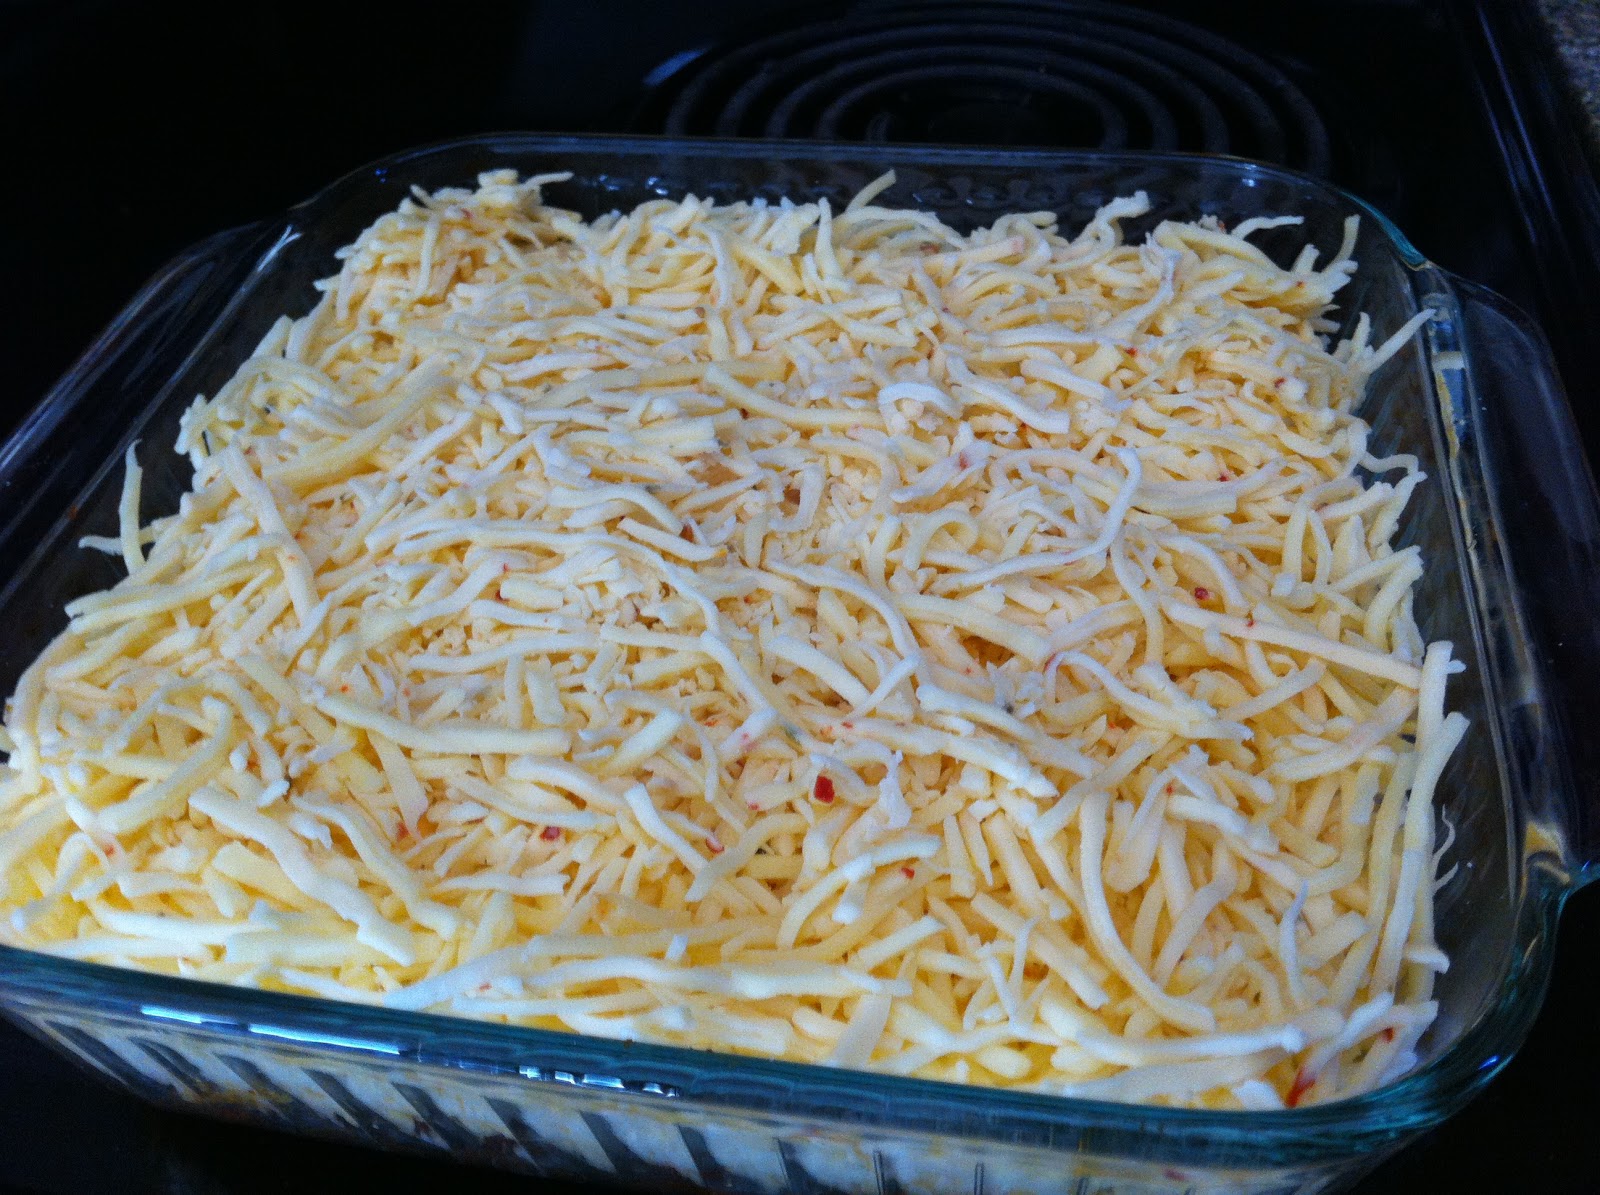
5. Place stuffed jalapenos on a lined cookie sheet (save yourself the clean up later).  Sprinkle with remaining 1 C of cheese shreds.

6. Bake for 20 minutes until lightly browned and bubbly.

Serve immediately.  Seriously, you might need to double up on this recipe.  It's best to make more than you think you'd need.  People will graze on these as long as they exist so be prepared.

Even people who don't like 'spicy' food will be attracted to this because the cream cheese helps to balance out the little heat from the jalapenos.

** Extra tip: Wear gloves through the cutting, cleaning, and stuffing process, even if this seems overkill.  Save yourself the embarrassment later when you wipe your eyes or something else and cause ridiculous burning sensations. **


Wednesday, November 21, 2012

Fall Munch Mix


Cause, you know, for kids!!  I found a similar recipe on Pinterest, but when I went shopping, I just became inspired by all of my choices.  Turns out you can really throw most anything in here and it'll probably taste okay.  I made two ginormous cauldrons of this mix, but here is the recipe for just one large cauldron...

Ingredients:
1/2 box of Kellogg's Krave cereal
1/2 box of Cinnamon Life cereal
1 large bag of caramel corn
1 large bag of kettle corn
1/2 bag pretzel sticks
1/2 bag mini pretzel twists
2 bags of 'autumn mix' candy pumpkins and candy corns
1 box of chocolate Teddy Grahams
2 king sized bags of M&Ms (plain)
2 king sized bags of Reese's Pieces (optional, dependent on allergies)

Directions: Mix together and serve!

Everyone (adults and kids) adored this mix.  It was the right combo of salty and sweet, and it saved me from serving other kid-friendly desserts and sweets (even though I did mini cupcake it up, per usual).

Monday, November 19, 2012

Fall Brie En Croute


Here's a super easy way to make a Brie en Croute that adds in all the goodies of our fall season.  It takes about 5 minutes to prep.

Ingredients:
1 can of crescent roll dough
8 oz wheel of Brie
1/3 C chopped pecans
1 T butter
1/4 tsp cinnamon
1/4 C dried cranberries
1/4 C brown sugar
1 egg, beaten

Directions:
1. Preheat oven to 350
2. Soak cranberries in water for a minute or two to take the edge off, then drain and pat dry.
3. In a small sauce pan, melt the butter.  Stir in pecans and cinnamon, toasting for 3 minutes.
4. Roll out crescent dough on a cookie sheet.  Place Brie, toasted pecans, cranberries, and brown sugar on top.  Wrap crescent dough around the goodness.
5. Brush top and sides of dough with beaten egg.
6. Bake for 15-20, or until nicely baked and browned.

Saturday, November 17, 2012

Apple Cider Caramels

I made these at 6:30 in the morning.  It's amazing how reducing apple cider that early in your day can accomplish two things...
1. Make your kitchen smell AMAZING.
2. Hypnotize you back to sleep.

Seriously?  Don't look directly into the pot in the beginning stages of this recipe.  You'll be lulled into a false sense of security and then BAM!  You need to actually pay attention and work.
Apple Cider Caramels are completely worth it, though!  (Just use a bigger pot than I did.  It got a little too close for comfort and I needed an actual pot.  Should've planned ahead!)

Ingredients:
2 C (high quality) apple cider
1 C heavy cream/whipping cream, divided
1 tsp ground cinnamon
pinch of nutmeg
1/4 tsp allspice
1 1/2 C sugar
1/3 C light corn syrup
1/2 C real butter, cubed
Directions:
1. Pour cider into a medium saucepan and boil on high for about 20 minutes, or until the cider reduces to 1/3 C.  Set aside to cool.
2. Line an 8" square pan with parchment paper, leaving at least 1" hanging over the edges for easy removal.  Coat with a little bit of vegetable oil and set aside.
3. In a small bowl, combine 2/3 C cream, cinnamon, nutmeg, allspice, and reduced apple cider, then set aside.
4. In a large, heavy saucepan, combine the sugar, 1/3 C whipping cream + enough water to reacy the 1/2 C line on the measuring cup, and corn syrup.
5. Cook over low heat until the sugar dissolves.  Insert a candy thermometer and simmer until the syrup reraches 234 degrees.
6. Remove from heat and slowly whisk in the cream mixture.  Add the cubed butter and stir in until the cream and butter are fully incorporated.  Return the pan to heat and re-insert the candy thermometer.
7. Cook over low heat, stirring frequently, until the temperature reaches 248 degrees.
8. Remove from heat and pour the caramel intot he prepared pan.  Let the mixture cool completely at room temperature or in the refrigerator.
9. Cover loosely until ready to cut.
10. Cut into 1/2" squares and wrap in wax paper and store in an air tight container for up to 2 weeks in the fridge.

* My thermometer runs a little high, so my caramels were more firm than chewy, but you can gauge pretty quickly when they're about ready by the color they are turning.

* Even as such, everyone loved them, and I'll definitely be making these again!


Thursday, November 15, 2012

Sweet Potato Sausage Skewers with Lemon Garlic Mayonnaise

Here's a great skewered appetizer that's tasty and easy!

First: The Lemon-Garlic Mayonnaise...
Ingredients:
1 C mayonnaise
2 T chopped fresh flat leaf parsley
2 tsp minced garlic
1 tsp lemon zest
2 T fresh lemon juice
1/2 tsp pepper
1/4 tsp salt

Directions:
Stir all ingredients together.
*Can store in an airtight container for up to 7 days.

 
Skewers' Ingredients:
2 lbs sweet potatoes, peeled, cut into 32, 1" cubes
2 T olive oil
1/2 tsp pepper
1/4 tsp salt
1/2 lb smoked sausage* cut into 32, 1/2" pieces
32 wooden picks

Directions:
1. Preheat oven to 450.  Place sweet potato cubes on lightly greased pan.  Drizzle with olive oil and sprinkle with salt and pepper.  Toss to coat.
2. Bake at 450 for 15-20 minutes, turning cubes twice.
3. Cook sausage over medium/high heat 3-4 minutes to brown.  Drain on paper towels.
4. Place 1 sasauge slice on 1 sweet potato cube on a wooden pick  Serve with Lemon Garlic Mayo.

* For the sausage, I used one I found at Costco.  It was an herbed mozzarella herb chicken sausage.  Amazing!

Tuesday, November 13, 2012

Pumpkin Cheesecake Bites

It's that pumpkin season that everyone so adores.  To celebrate?  Other than our favorite ermahgerd girl?? 
How about some pumpkin cheesecake bites?  Now, if you're like me, you might not be a huge cheesecake person, but give these a chance.  They are AMAZE BALLS.  F'realz.

Ingredients:
15 oz canned pumpking (not pie, just pumpkin)
3 eggs
1/2 C brown sugar
2 T cream
1 tsp vanilla
1/2 C granulated sugar
1 T cornstarch
1 1/2 tsp cinnamon
1/2 tsp nutmeg
1/2 tsp ginger
1/2 tsp salt
1.5 lbs cream cheese (room temp)
Ingredients (crust):
2 sleeves of graham crackers (18 crackers)
1 stick butter, melted
1/4 C sugar
* whipped cream to top
Directions:
1. Pre-heat oven to 400 degrees
2. In a large bowl, crush the graham crackers (or process them to make it easier). Add sugar and melted butter and mix well.  Press into a parchment lined pan and bake for 5 minutes until toasty.
3. Reduce oven temp to 325 degrees.
4. Mix together pumpkin, eggs, brown sugar, cream, and vanilla in a large bowl.
5. In a separate bowl, beat together cream cheese, sugar, cornstarch, cinnamon, nutmeg, salt, and ginger.  Beat until light and fluffy.
6. Slowly pour in pumpkin mixture.  Continue beating until smooth and no lumps remain.
7. Pour batter onto cooked crust and bake for 50 minutes or until edges begin to pull away from the side of the pan.
8. Cool completely before removing from pan, then cut into small squares and top with whipped cream.


Sunday, November 11, 2012

Cookie Dough(n't You Want Some) Frosting?!

For my BFFL's birthday, there had to be dessert.  He's not a cake person (my friend?  NO!!), but he likes cookies and is tolerant of brownies.  My compromise?  Triple Chocolate Ghiradelli Brownies (made into individual cupcakes with an egg-free) Chocolate Chip Cookie Dough Frosting.
Ingredients:
3 sticks unsalted butter (1.5 C) at room temp
3/4 C light brown sugar, packed
3 1/2 C confectioner's sugar (powdered sugar)
1 C flour
3/4 tsp salt
3T milk
3 1/2 tsp vanilla extract
1 C mini chocolate chips

Directions:
1. Beat together brown suagr and butter until creamy.
2. Mix in confectioner's sugar until smooth.
3. Beat in flour and salt until smooth.
4. Mix in vanilla and milk until well blended.
5. Stir in chocolate chips.
6. Chill to make more firm, but just heap it on your cupcakes. There's no need to be pretty about it!
I think these are best a little chilled, but room temp isn't bad, either, they just get excessively gooey!  :)
 
Why yes, that is Scary Spice popping out of his cupcake frosting.  Why do you ask?
 PS - if you take these to a bar, everyone will be your friend if you share!!

Friday, November 9, 2012

Fortune Cookies

My husband LOVES a good Chinese buffet.  Shoot, he loves a bad Chinese buffet, if it has at least one dish he loves.  Me?  Meh.  I like sweet and sour sauce and that's about it.  The rest I tolerate out of love.  However?  The best part about "Chinese" food for me is the fortune cookie that you get with the bill!

I know, fortune cookies aren't Chinese.  However, I think we've associated the two together for enough years (much the way we believe our pizza comes from Italy and our fries come from France) that it's just kind of tolerated in that, "you're a big dumb American" kind of way.
I've always wanted to try to make them, so when I found this recipe I knew I was in it to win it.  For the record, though, these are very soft and doughy, not crispy/crunchy.  (You've been forewarned.)
Ingredients:
3 egg whites
3/4 C white sugar
1/2 C butter, melted and cooled
1/4 tsp vanilla extract
1/4 tsp almond extract
1 C flour
2 T water

Directions:
1. Write out your fortunes and cut them on small strips.  Preheat the oven to 375.
2. Separate the eggs
3. Whip egg whites and sugar until frothy.
4. Stir in butter, vanilla, almond, water, and flour.  It should turn into a pancake batter like consistency.
5. Grease a cookie sheet (lined for ease)
6. Spoon batter into circles on the sheet, about 3 inches across.
7. Bake until the edges only begin to brown (about 4-5 minutes)
8. Immediately remove from oven, place the fortune in the middle.  Fold in half to make a half circle.  Then, pull the two edges together, making the straight edge of your half circle meet at it's 'corners'.
9. Place the finished product in a muffin tin to help retain the shape while they cool.  Give them a good hour+.

Please note - you have to work as soon as they come out of the oven.  You have to work quickly to not burn your fingertips or to crack the dough.  It's a quick process, so I didn't cook more than 6 at a time, and I had someone to help me.  I'd take 6 out, put 6 in, and that way we were constantly moving.  It's not easy, but it's certainly fun, and I'd recommend it for any small, special occasion.


Wednesday, November 7, 2012

Queso Fundido

Hey, everyone!  Sorry for the short break.  It's been crazy hectic and I hadn't had a chance to get my photos off my phone to start posting again.  Completely lame?  For sure!  But now I'm back and I'm ready to swing into that holiday season with all of you.  First off, a dish I made for Labor day that got lost in the shuffle, some how...  :)

I love queso fundido!  There's something about the creamy deliciousness that I can't ignore.  Just the right amount of meat and cheese and tortilla.  If someone is having a Mexican get together, it's my go to for sure.
Ingredients (I doubled these for my dish):
1/2 lb chorizo
1/4 onion, diced
1 bell pepper (or hot pepper, depending on your preference), diced
2 C of cheese (I like a nice white cheese, but anything that melts well works fine)
12 small corn (or flour) tortillas, warmed
Directions:
1. Saute your onion until translucent, add pepper.
2. Once cooked, add the chorizo.
3. Cook all, drain off the excess oil. 
* The problem with chorizo is it doesn't really every change color or consistency.  Just give it a good 10+ minutes.  Use your best judgement. *
4. Press meat mixture into a lightly greased 8x8 dish.
5. Top with cheese
6. Bake at 350 until melted and bubbly
7. Spoon into warmed tortillas and enjoy.  ( I didn't get a final picture because it was devoured too quickly.  Sorry!!)
Also, I prepped this the day before and did the final baking the day of.  My "final" picture below is what I covered and saved for the cookout the next day.  Much easier that way then trying to reheat this dish after it's been baked.  It's best served immediately.