Showing posts with label bell pepper. Show all posts

Tuesday, November 27, 2012

Two Easy Apps


Here are two quick appetizer ideas that I worked with for our last party...

1. Hummus served on bell peppers.

I used both plain and sun dried tomato hummus, and piped them onto chopped pepper pieces.

Great for presentation and made my buffet line move quickly since people could just grab and go.
2. Beeting Heart Skewers

This was nice because it was easy to make and I love using beets for the color they give.

Ingredients:
8 oz fresh goat cheese, at room temperature
2 tsp finely chopped fresh rosemary
1/4 tsp freshly cracked pepper
8 oz baby beets, peeled and steamed, divided into 36 pieces
14 oz whole hearts of palm
36, 4" skewers

Directions:
1. Mix together the cheese, rosemary, and pepper.  Roll into 36 balls, approximately 3/4" big
2. Place goat cheese, beet piece, and heart of palm on each skewer
3. Arrange/serve as desired.

Saturday, August 25, 2012

Can Do Attitude: Easy Garden Salsa

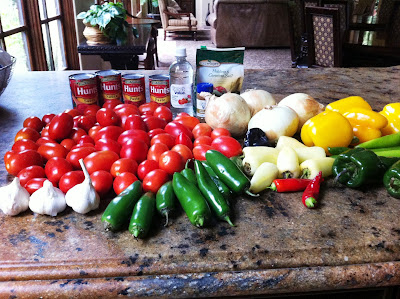
 Yeah, all of those tomatoes are fresh out of my garden.  Everything else, not so much, but these ingredients made a double batch of salsa, so 16 and 3/4 quart jars.

Also, I only used one head of garlic, and one of those really large onions.
And yes, I did use all those peppers.  I wanted a nice variety of spice, so there are random hot red peppers and purple bells from my garden, Anaheims, poblanos, jalapenos, whites, and yellow bells.  You can use as much or as little as you'd want.  I love chunky salsas with lots of pepper.
As far as the tomatoes go, I just divided my crop in half (since I was doubling the recipe).  They're Roma tomatoes, so I seeded most of them, but there wasn't a lot to worry about.

For each batch, I diced half in bigger chunks, then used my slap chop to finely dice the other half.  The chopper also made quick work of the onions and peppers.  I still wore gloves, though, because that juice gets everywhere and I hate accidentally getting it in my eyes (or worse) when cleaning up.

So, the ingredients for one batch (about 6-8 quarts)
8 C tomatoes; chopped, diced, and drained
2 1/2 C onions, diced
1 1/2 C green peppers, diced
1 C jalapeno, diced
6 garlic cloves, minced
2 tsp cumin
2 tsp ground pepper
1/8 C (or less) canning salt (optional)
1/3 C sugar
1/3 C vinegar
15 oz can tomato sauce
12 oz can tomato paste

Directions:
Mix everything together in a large pot.
Bring to a slow boil.
Boil for ten minutes.

Follow proper canning procedures.  Sterilized jars, boiling water bath for 10 minutes.  Let cool and wait at least 24 hours before storing.

Hint: to prevent the white grit from collecting on your tops, add about 1/2 C of white vinegar to your water bath.  It helps reduce/eliminate the residue.  ( I obviously forgot this step!)


Sunday, July 29, 2012

Ham and Pineapple Biscuit Pizzas

Here's a super simple mini "Hawai'ian" pizza biscuit idea.  People loved them, and (other than some chopping) took no time to create at all.

Ingredients:
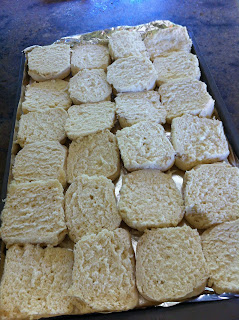
12 buttermilk biscuits (I used pre-made, frozen), cut in half
1/2 C pizza sauce
24 slices of Canadian Bacon (or just chop up a smoked ham steak)
1/2 C drained pineapple tidbits
1 bell pepper, diced
1/2 C shredded Colby Jack Cheese
Directions:
1. Prepare biscuits, if necessary, then slice in half.
2. Line baking sheet with biscuits, cut side up.
3. Smear pizza sauce on each biscuit.
4. Top with ham, pineapple, and bell pepper.
5. Sprinkle shredded cheese over the top
6. Bake 7-9 minutes at 350, or until cheese is completely melted.
7. Serve and enjoy.
This go over well.  They still do fine at room temperature, and if you refrigerate them, they do well the next day reheated as a snack.


Sunday, March 18, 2012

Southwest Chicken Wraps

 The original recipe can be found here.  I know, I know, I didn't really follow it, but before we start off on the wrong foot, I want you to know my inspiration!

My ingredients:
1 Bell Pepper, cut into strips
2 Celery stalks, thinly sliced (could have used more)
1 lb pre-cooked chicken, cut into strips
whole wheat tortillas
toppings: lettuce and shredded cheese

The biggest departure point on that ingredient list is the celery.  I've never tried celery in my fajitas before.  I stir fried the peppers and celery, then added the chicken to heat through.  The celery maintains its consistency so well, I think I'll add it to all future fajitas.

The other part that's different is the sauce.  I normally add salsa and guacamole to my fajitas, but I created this sauce instead.  It was 1/2 C light mayo and 3/4 C fat free ranch, with about 2 T of taco seasoning.  That might be two packets' worth, I'm not sure.  I always buy it in bulk.

 The original recipe calls for you to cook the chicken (if necessary) and to mix it up in the sauce.  Thomas loves sauces, and if he were home I might have done it as such.  However, I just drizzled about 2 teaspoons of the SW sauce over my meat as I was creating the fajita and it added the right amount of flavor for me.  This sauce was definitely easier than making guac and salsa, but if you have those on hand, it might be interesting to try it all together.

Super YUM!

Monday, March 12, 2012

Crock Pot's Finest

 Okay, Crock Pots hate me.

True story.

I'm the only person in this world that could mess up a crock pot recipe, unless it's for an apple butter or chutney.

However, I found this recipe for Cilantro Lime Chicken, and it looked so good I could resist.
 I also couldn't resist tweaking it a bit.

First off, instead of plain salsa, I used a generic brand of Peach Pineapple Chipotle Salsa, still 24 oz.

And instead of 2 jalapenos, I used 1 and 1 bell pepper.

And then it looked super chunky - like the picture to the right, so I added a can of Rotel Tomato and Chili sauce.
 Once the mixture looked more liquidy, I added the chicken.

Oh, but I used 8 chicken thigh tenders instead of 4-6 breast halves.  I just like dark meat more, okay?!

And then I put it on high, because I wanted it done in two hours.

HAHA!  Didn't happen.
 Our Crock Pot, well this one, rather (we have 4 or five of various sizes) has a timer function where it cooks for the time you set it for.

I set it on high for 4 hours, and by the time I had prepped everything and added it to the pot, it was at 3:47 remaining.  That's an easy prep, yes?

Ended up with that as the cooking time, too.

However I had eaten by then, so it made 6 hearty lunch/dinner portions when added to my cilantro brown rice.

Sorry, no pretty shots, just Tupperware.

But when I did eventually try it, it was completely worth the wait!  I can't wait to have this again, and maybe serve it with tortillas next time, too.  So juicy and tender, you should try this one ASAP!!

Tuesday, March 6, 2012

Two-fer Tuesday!

In order to celebrate my benevolence today (Thomas is coming home, how could I not feel in great spirits?!), I'll doling out two recipes for the price of none!  Yay!!

The first is an easy and relatively healthy Thai Lime Chicken.  I love a good peanut flavored dish, so this was a no brainer for me.  Plus, it only has five ingredients, of which I just needed to buy the lime, so that was a HUGE bonus.


 Of course, I also had the added bonus of being able to use my Pampered Chef Citrus Press...  It always makes my life so much more simple!

You juice the lime over the chicken (top and bottom), and then coat the chicken with your peanut/ginger/garlic mixture.

How easy is that?!  Plus, it doesn't take terribly long to cook, so it's an easy dish all around.

Bake it at 375 for about 25 minutes.

Oh, but that other dish?  The side dish for this one?

Yeah, I might have made it with Brown Rice, so in this case, the side took longer than the main.

Ah well.

For my side, I threw some peppers on a skillet to cook them through.  Didn't add oil, salt or anything, just cooked them to an al dente.

But the long rice dish I made, that was a skinny knock off of Chipotle's Cilantro Lime Rice.  I used barely any oil, and only salted the water.  We're trying to be more heart healthy, so this was an experimental dish.
 I used barely any oil, and only salted the water.  We're trying to be more heart healthy around the house, so this was an experimental dish.  However, it was still tasty, and the brown Jasmine rice held up well again.

Definitely impressed.

So that was my two-fer.  Thomas gave them all a thumbs up, and the flavors complimented each other nicely.  Plus I made a double batch of the rice to sue as a side dish for weeks to come!

Thursday, January 26, 2012

*Healthy* Stuffed Pepper Soup


Thank you, Pinterest, for introducing me to Skinnytaste!  This blogger has all kinds of healthy recipes, and most of them are feasible with limited ingredients so you really feel like a master chef while trying to keep yourself fed!

Amazing!!

Well, in any case, everyone seems to be pinning this recipe for Stuffed Pepper Soup.  I couldn't resist trying it since I love stuffed peppers, but hate making them!
Ingredients - I tweaked them a little...

1 lb ground beef
2 small green bell peppers (chopped)
1 lg red and 1 lg yellow bell pepper (chopped)
1 cup finely diced onion
2-3 garlic cloves (diced/pressed)
2 (14.5 oz) cans of diced tomatoes
2 (8oz) cans of tomato sauce
1 box (32 oz) of low sodium chicken broth
Italian seasoning, salt, and pepper to taste
3 cups of cooked rice (Jasmine for me, but there are healthier options, of course.  Almost used Quinoa...  almost!)
Desilu (left) and Schatzi (right) love when I work with bell peppers.  I always give them some of the oddly shaped dices since I don't like how odd they look. I know I'm weird, but the dogs definitely love the benefits of my cooking!

Basically, you brown the meat, add the onions, and garlic.  Then add in your peppers and cook it up until everything looks done (browned meat, al dente peppers, clear onions...).


 Add your sauce, tomatoes, broth and seasonings.

Let the soup simmer for at least 30 minutes.  I added a lot of broth because I added lots of peppers and probably a little more than a pound of meat.

I'm not a broth person, so I love condensing the soup down as much as possible.
I cooked the rice while simmering the soup.

You don't need the rice, but if you're like me and like a heartier soup, then it definitely helps.  I just served up the soup, added a heaping spoonful of rice, and stirred it up.

Also, as a side note, I barely salted the soup because I knew I was salting the rice water and didn't want to double dip on the saltiness.  I'm not much of a salt person, but it's healthier that way, anyway!
One bowl is enough!  This soup is so delicious, you'll be tempted for more, but it's filling, so it's all good!

Sunday, January 22, 2012

Happy 100 Posts!

It wasn't supposed to happen this way...  My 100th post was going to be a recap and something fun.  I have lots of great recipes coming up, and any one of them would have been great for dinner and celebration.

And then life gets in the way.  Family obligations and short planning for dinner equals one FABULOUS pasta dish that takes very little time to make, is low fat(ish), and fairly flavorful!  Maybe we knew I was fated to have a pasta dish as my 100th any way.  We know how I love it!

Here's the original recipe (no, not KFC!)...  I was worried about not apparent sauce, but I was excited because it wasn't a creamy sauce and it wasn't an oily sauce, just noodles, meat, and veg.  A perfect combo for a night by myself, and I knew I could get a ton of leftovers.

Here's what I did...
Ingredients:
1 box of Ziti pasta (make as you normally would a box of pasta)
1ish T of Olive Oil


1 pkg of Jennie O Smoked Turkey Sausage (angle sliced)
2 bell peppers (chunky diced)
about 1/2 of a small onion (diced)
2 cloves of garlic (pressed/diced)
Ground Pepper and Italian Seasoning to taste
3 T of grated Asiago Cheese
1/4 C of pasta water reserved

Heat olive oil, saute onions, garlic, and bell peppers.  Add seasonings.
Add Smoked Sausage and heat through.
Once the Ziti is prepped, mix in the drained pasta to the cooked through meat and veg.
Toss, and if it looks dry, add a little pasta water.  Sprinkle with cheese, then serve with your favorite crusty bread and enjoy.

That's it.  Really.

Yep.  It seems as though my 100th blog entry is just like every other entry.  Simple, easy, and new (for me).  So here's to the next 100.  Here's to new dinners and desserts, and maybe more breakfasts and brunches too.  This has been an awesome 8 months, and here's to many, many more.

Have fun and eat well!

J

Tuesday, January 17, 2012

Sweet and Sour Chicken

 As I ramble through Pinterest, I find more and more every day that I want to try.  Luckily, I have a hungry husband to help me eat up my creations, and all of the leftovers!  Unfortunately, he'll start travelling soon and it'll be meals for one with more leftovers than I know what to do with.  Maybe I'll share with my employees to make things go more quickly.  Luckily, what I made for last night's dinner was so wonderful, there were barely any leftovers, and what is left will be gone within a lunch or two!  {Whew! Talk about rambling!}
 Just the same, I came across this recipe for Sweet and Sour Chicken...  Which happens to be the only dish I'll eat at a Chinese restaurant because I love the way the sauce makes my rice pink (sometimes hot pink), and the veggies.  The chicken is neither here nor there, but I LOVE SWEET AND SOUR!

Here's my recipe, which I tweaked from the other:
Ingredients:
LOTS of Veggies!  Such as...
10 oz of sugar snap peas
2 bell peppers
2 celery stalks
10 baby carrots
1 can water chestnuts
1 can pineapple chunks
and I was going to add Manderin Oranges, but changed my mind last minute.


Plus, two pounds of teriyaki chicken breast.  I get this pre-cooked from Fresh and Easy.  The original recipe calls for you to bread and fry, but I wanted less fat, so I chose this as an easy alternative.

The sauce was ridiculously simple, too - why have I not made this before?!?!
1 C sugar - could probably cut this back more
1/2 C ketchup
3/4 C cider vinegar
1 T Worcestershire sauce (or soy sauce)
2 T garlic powder - could probably cut this back to
1 1/2 T.

I mixed up the sauce, wok-ed/fried the veggies in about 1 T of olive oil, added the chicken and poured the sauce over the top.  I waited until everything was heated through and then served it up with Jasmine rice.  If it were up to me, I'd almost double the sauce, but I LOVE S&S, so that's a personal preference.  Thomas loved the meal, and the vinegar in the sauce helped to clear his cold-riddled head long enough to enjoy the meal.  Perfect all around.  Plus, it was so simple and took very little time.  Thomas thought I should have breaded the chicken, but when he tasted it, he said it played well, so no breading/frying for this girl!

Tuesday, October 18, 2011

30 Minute Meal - I timed it!!!

Yes, a lot of generics.  Spend your own money!
6:00PM - Grab your ingredients.  

6:02 - Measure the correct measurements for your rice, start the salted water to boil.  (I really love Jasmine rice, but your fav would do well too, I'm sure.)

6:04 -  Heat oil in a large wok or pot.  Once hot, saute your pressed garlic for 5-10 seconds to start releasing the aroma.  Yum!
6:05 - Add your ground beef.  I usually double up the recipe because this also makes for great leftovers.  So, here you'll see two pounds of beef, two bell peppers, an entire head of cabbage (it cooks down more than you'd think), and the appropriate spices.

6:10 - Water boiling yet?  If so, add your rice and turn it down to a simmer.  (Obviously, follow your own directions or use a rice steamer.  Make a plan.)
 6:15 - hopefully by now your meat is nicely browned.  I don't drain it because the liquid (if there's any) thickens later.  At this point, add your cabbage and peppers.  Peppers that aren't green make the best presentation, but I take what's on sale/in the house!  Cook until tender.
6:20 - this picture is before the cabbage cooked all the way down, it was about halfway here.  Once your veggies are tender, add your soy sauce, water/corn starch as directed, and let it simmer for the last ten minutes to thicken your sauce.

6:25 - rice should be done.  Turn off the heat, add some butter (or whatever), fluff it, and let it sit (covered)

6:30 - Serve and enjoy.  :)
6:40, fight your significant other for seconds!!

Monday, July 25, 2011

Easy Chicken Fajitas!

It has come to pass, in my short decade or so of cooking, that if a recipe claims to be "easy," AKA, easy is part of the title, then I'm hooked.  I don't think I (necessarily) look for the easy way out of life, I just know that when it comes to my limitations, I don't want to spend my time making flop meals.  I'd rather make a meal that I'm almost guaranteed success in then to try one too difficult and fail spectacularly.

 
Hence, tonight's Easy Chicken Fajitas.  We make all sorts of wraps all the time, so I'm no stranger to the taco/fajita game.  I know what's going to tast great, and what I could probably skip on.  This recipe was easy enough, and it pretty much followed through on the way I normally make fajitas.  Since we had just about everything in the house, it was the winner winner chicken dinner of the night.  I can also say that I pretty much stuck to the recipe on this, although I also added some taco seasoning to the chicken for kick.

They say there's no wrong way to eat a Reese's.  I'd like to contend that there's no wrong way to build a wrap, just pile it on and enjoy!